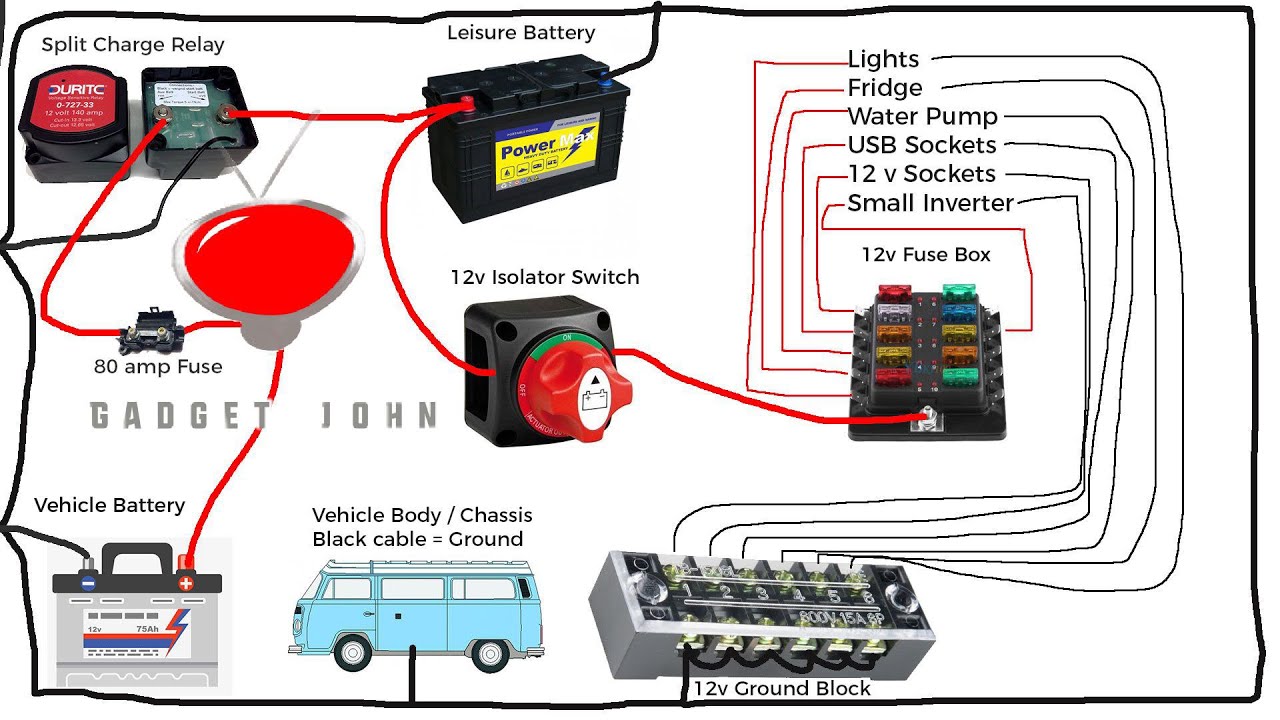
Battery switch on travel trailer function is crucial for managing your RV’s power. Understanding how this simple yet vital component works is key to preventing dead batteries, maximizing your solar setup, and ensuring safe operation of your travel trailer’s electrical system. This guide dives into the different types of switches, their functions, troubleshooting common problems, and essential safety tips to keep your RV running smoothly.
We’ll cover everything from basic operation to advanced integration with solar panels and inverters, empowering you to confidently handle your travel trailer’s electrical needs. Whether you’re a seasoned RVer or a first-timer, this guide will equip you with the knowledge to keep your power on the road.
Battery Switch Types in Travel Trailers
Choosing the right battery switch for your travel trailer is crucial for managing power and protecting your electrical system. Understanding the different types available will help you make an informed decision based on your specific needs and setup. This section details the common types, their advantages and disadvantages, and provides a comparison of their wiring.
Single-Pole Battery Switches
Single-pole switches are the simplest type. They control the power flow from one battery to the trailer’s electrical system. They’re often used in setups with a single house battery. A single-pole switch has only one switch blade that breaks the circuit. The advantage is simplicity and lower cost.
However, they only offer ON or OFF functionality for a single battery source. They lack the ability to isolate the battery from the trailer’s electrical system, which could be a safety concern during maintenance or repairs. A typical wiring diagram would show a single wire from the battery connected to one terminal of the switch, and a wire leading to the trailer’s electrical system connected to the other terminal.
Double-Pole Battery Switches
Double-pole switches offer more control than single-pole switches. They have two switch blades, allowing you to isolate the battery completely from the trailer’s electrical system. This improved safety feature is critical during maintenance or repairs. While offering better safety, double-pole switches still only control one battery source at a time. The wiring diagram would show two wires from the battery (positive and negative) each connected to their respective terminals on the switch.
The other side of the switch would connect to the trailer’s positive and negative bus bars.
Double-Pole Double-Throw (DPDT) Battery Switches
DPDT switches are the most versatile option, allowing you to switch between two battery sources (e.g., a house battery and a starting battery). This is particularly useful for extended camping trips. They provide the safety features of a double-pole switch along with the ability to select between multiple power sources. However, they are more complex and more expensive than single-pole or double-pole switches.
The wiring diagram is more complex, showing connections to both batteries and the trailer’s system. This configuration allows for seamless switching between batteries, maximizing battery life and avoiding power interruptions.
Okay, so you’re dealing with your travel trailer’s battery, right? Knowing how to use that battery switch is key! Check out this super helpful guide on the battery switch on travel trailer function to understand how it works. It’ll explain how to safely switch between your trailer battery and your truck’s battery. Then, for a more financial-focused perspective on maintaining your RV’s power system (including those batteries!), take a look at this resource on battery switch on travel trailer function – it might cover things like battery lifespan and replacement costs.
Knowing your battery system is a huge part of enjoying hassle-free adventures!
Battery Switch Specifications and Features
This table compares the features of several common battery switch brands. Note that specifications can vary by model.
| Brand | Type | Amperage Rating | Features |
|---|---|---|---|
| Blue Sea Systems | Single-Pole, Double-Pole, DPDT | Various (check specific model) | High-quality construction, robust design, various amperage options |
| Perko | Single-Pole, Double-Pole | Various (check specific model) | Durable, corrosion-resistant, often used in marine applications |
| Xantrex | DPDT | Various (check specific model) | Often integrated into larger power management systems |
| Generic/Unknown | Single-Pole, Double-Pole, DPDT | Variable | Lower cost options, but may lack the robustness of name-brand switches. Always check amperage rating before installation. |
Function and Purpose of the Battery Switch
The battery switch in your travel trailer is a crucial component of its electrical system, acting as a central control point for your batteries. It’s designed to manage power flow, protect your batteries, and ultimately extend their lifespan. Understanding its function is key to responsible RV ownership.The primary function of the battery switch is to isolate the house batteries from the chassis battery and from any external power sources like shore power or a generator.
So, you’re hitting the road in your travel trailer, right? Knowing how to manage your power is key, and that starts with understanding your battery switch. Check out this guide on the battery switch on travel trailer function to learn the basics. It’s super important to know how to properly disconnect your batteries when you’re not using the trailer to avoid draining them.
This will save you headaches (and money!) down the line. For more detailed financial considerations related to your trailer’s battery system, including maintenance and replacement costs, browse this resource on the battery switch on travel trailer function and how it affects your overall expenses. Happy travels!
This isolation is vital for preventing unwanted battery drain when your trailer isn’t in use. Without the switch, a small parasitic drain from things like clocks or low-power sensors could eventually deplete your batteries, leaving you stranded. The switch allows you to completely disconnect the house batteries, ensuring they remain fully charged for when you need them.
Battery Isolation
The battery switch achieves isolation by physically breaking the electrical connection between the different battery banks. Most switches use a simple on/off mechanism, sometimes with an additional “off” position that completely disconnects the batteries. This prevents any current flow between the house batteries (which power your interior lights, appliances, and other systems) and the chassis battery (which powers the trailer’s braking system and other essential functions).
This separation is important because a dead house battery shouldn’t affect the critical functions that rely on the chassis battery.
Preventing Battery Drain
Leaving your battery switch in the “on” position while your trailer is in storage can lead to a slow but steady drain on your house batteries. Even small devices drawing minimal power can add up over time, especially if you’re storing the trailer for several months. The battery switch allows you to fully disconnect the house batteries, preventing this drain and ensuring they remain charged and ready to use when you’re ready to hit the road.
This is particularly crucial in colder climates, where battery capacity is naturally reduced.
Safe Operation of the Battery Switch, Battery switch on travel trailer function
Properly operating the battery switch is simple but important. Always remember to turn off any appliances or devices running on the house batteries before switching them off. A step-by-step procedure ensures you do it safely:
- Turn off all appliances and electronics connected to the house battery system.
- Locate the battery switch. It’s usually clearly labeled and accessible near the batteries themselves.
- Carefully turn the switch to the “off” position. The exact method will vary slightly depending on the type of switch, but it generally involves rotating a lever or knob.
- Verify that the switch is in the “off” position.
- When ready to use the house batteries, reverse the process, starting with the switch and then turning on appliances and electronics as needed.
Troubleshooting Common Battery Switch Issues
Your travel trailer’s battery switch is a crucial component, ensuring you can control power to your house batteries. Problems with this switch can leave you stranded without lights, water pump, or other essential systems. Understanding common issues and how to troubleshoot them is key to maintaining a smooth camping experience.Troubleshooting a malfunctioning battery switch involves a systematic approach, checking for simple issues before moving to more complex repairs.
This process can save you time and potentially costly repairs by identifying the problem quickly and accurately.
Common Battery Switch Problems
Several issues can plague your travel trailer’s battery switch. Corrosion is a frequent culprit, building up on terminals and hindering the flow of electricity. Loose connections, often caused by vibration during travel, can also interrupt the circuit. Finally, the switch itself can fail due to wear and tear, age, or exposure to the elements. These problems often manifest as a complete lack of power to the house batteries or intermittent power failures.
Diagnosing a Malfunctioning Battery Switch
Before you start replacing parts, systematically check the simplest things first. Begin by visually inspecting the switch and its connections. Look for corrosion on the terminals – a white, powdery substance or green discoloration is a clear sign. Clean the terminals with a wire brush and baking soda solution to remove corrosion. Tighten any loose connections.
If the problem persists, test the switch itself using a multimeter. A multimeter can verify whether the switch is properly conducting electricity when it should be.
Troubleshooting Flowchart
Imagine a flowchart with the following steps:
1. Visual Inspection
Inspect the battery switch and connections for corrosion or loose wires. If found, clean terminals and tighten connections. If the problem is resolved, stop. If not, proceed to step 2.
2. Multimeter Test
Use a multimeter to test continuity across the switch terminals in both the “on” and “off” positions. If the switch does not show continuity when it should (on position), or shows continuity when it shouldn’t (off position), the switch is faulty and needs replacing. If the multimeter shows proper continuity, proceed to step 3.
3. Battery and Wiring Check
Check the battery voltage and the wiring leading to and from the switch for any breaks or damage. A faulty battery or damaged wiring could mimic a switch problem. If a problem is found, repair or replace the battery or wiring. If no problem is found, consider seeking professional help.
Repair Procedures
Replacing a battery switch is usually a straightforward process. First, disconnect the negative battery cable to prevent electrical shock. Then, remove the switch from its mounting location, usually with a few screws. Carefully note the wiring configuration before disconnecting the wires from the old switch. Install the new switch, ensuring the wires are correctly connected according to your notes.
Reconnect the negative battery cable and test the switch’s functionality. Remember to always consult your travel trailer’s wiring diagram for specific instructions. Replacing corroded terminals might involve using terminal cleaners or replacing the entire terminal connectors. Repairing loose connections usually involves tightening the screws or bolts that secure the connections. For more extensive wiring problems, you might need to replace sections of the wire or seek professional assistance.
Safety Precautions When Using the Battery Switch: Battery Switch On Travel Trailer Function
Working with your travel trailer’s battery system requires careful attention to safety. Improper handling can lead to serious injury from electrical shock, burns, or explosions. Always prioritize safety to prevent accidents and ensure the longevity of your battery system.
Battery switches, while seemingly simple, are crucial components in managing your RV’s power. Understanding the risks involved and taking the necessary precautions is paramount for a safe and enjoyable camping experience. This section details essential safety practices to follow when working with your battery switch and batteries.
Necessary Tools and Safety Equipment
Before beginning any work on your battery switch or batteries, gather the appropriate tools and safety equipment. This ensures you’re prepared to handle any situation safely and efficiently. Improper tools can lead to damage or injury.
- Insulated gloves: These protect your hands from electrical shocks.
- Safety glasses: These protect your eyes from sparks or acid splashes.
- Wrench or socket (appropriate size for your battery terminals): For disconnecting and connecting battery cables.
- Baking soda and water: To neutralize any battery acid spills.
- A well-ventilated area: Battery gases are harmful, so work outdoors or in a well-ventilated space.
Safe Battery Handling and Connection Guidelines
Proper handling of batteries is critical to prevent accidents. Follow these guidelines to minimize risks. Remember, even seemingly small mistakes can have serious consequences.
- Always disconnect the negative (-) terminal first when removing a battery or working on the battery system. This prevents accidental short circuits.
- When connecting the battery, always connect the positive (+) terminal last. This same principle minimizes the risk of accidental shorts.
- Inspect battery terminals and cables for corrosion before connecting or disconnecting. Clean any corrosion with a wire brush and baking soda solution. Corrosion can impede connection and create a fire hazard.
- Never allow metal tools to touch both battery terminals simultaneously. This could cause a short circuit and damage the battery or tools.
- Never work on the battery system while smoking or near open flames. Battery gases are highly flammable.
- If battery acid spills, neutralize it immediately with a baking soda and water solution. Avoid direct skin contact with the acid.
Potential Risks of Incorrect Battery Switch Operation
Misoperation of the battery switch can lead to several problems, some potentially dangerous. Understanding these risks helps prevent costly mistakes and potential harm.
Incorrect operation could lead to unintended power disconnections, leaving you without essential appliances or lighting. More seriously, improper switching could create short circuits, potentially damaging the battery switch, batteries, or even causing a fire. Furthermore, accidentally leaving the battery switch in the “on” position while the trailer is not in use can lead to premature battery drain and reduced lifespan.
Finally, attempting repairs without proper safety precautions increases the risk of electric shock or chemical burns.
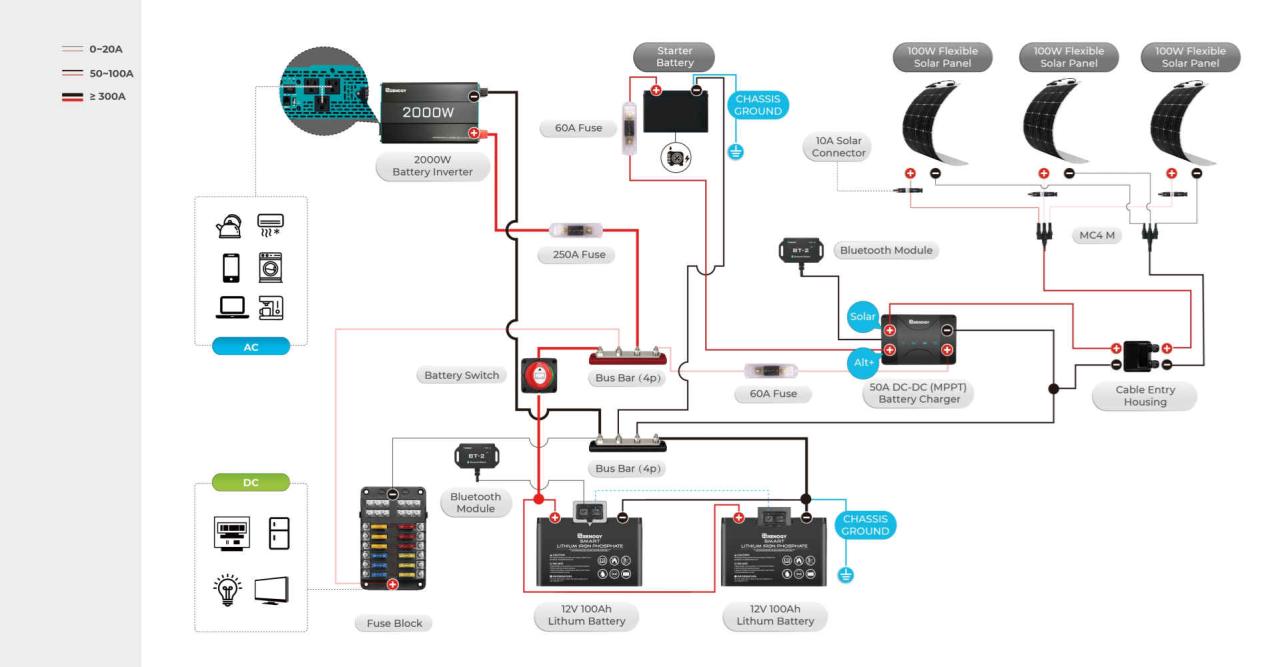
Battery Switch and Solar Panel Integration
Integrating a solar panel system with your travel trailer’s battery switch offers a streamlined and efficient way to manage your power. The battery switch acts as the central control point, allowing you to isolate or connect your house batteries to the solar charging system, ensuring safe and effective charging. Understanding this interaction is crucial for maximizing your solar power setup.The battery switch acts as a gatekeeper between your solar panels and your house batteries.
When the switch is in the “on” position, the solar charge controller can send power directly to the batteries. When the switch is off, it isolates the batteries from the solar panels, preventing back-feeding or accidental discharges. This is particularly important for safety and to prevent potential damage to your system’s components.
Solar Panel System Connection to the Battery Switch
Properly connecting a solar panel system involves a few key steps. First, the solar panels themselves connect to a solar charge controller. This controller regulates the voltage and current from the panels to safely charge your batteries. The output of the charge controller then connects to the battery switch’s input terminals. This input terminal should be clearly labeled and often designated as a “solar” input.
Finally, the output terminals of the battery switch connect to your house batteries. This ensures that the solar charge controller only sends power to the batteries when the switch is in the “on” position.
Setting Up a Solar Panel Charging System with a Battery Switch
Setting up the system requires a basic understanding of electrical wiring. Begin by securely mounting the solar panels on your travel trailer’s roof, ensuring proper orientation for maximum sunlight exposure. Next, run the wiring from the panels to the charge controller, carefully connecting positive (+) and negative (-) wires correctly. The charge controller should be installed in a dry, well-ventilated location inside your trailer.
Connect the charge controller’s output to the battery switch’s designated solar input terminals, again ensuring correct polarity. Finally, connect the output terminals of the battery switch to your house batteries, following the wiring diagram and paying close attention to the positive and negative terminals.
Wiring Diagram for Solar Panel System with Battery Switch
Imagine a simple diagram. At the top, you see the solar panels connected by a pair of wires to a rectangular box representing the solar charge controller. Two wires extend from the charge controller’s output labeled “+12V” and “-12V”. These wires lead to the battery switch, represented as a three-position switch (OFF, Battery 1, Battery 2/Solar). The “+12V” wire connects to the switch’s input terminal.
From the battery switch’s output terminals, another set of “+12V” and “-12V” wires runs to your house batteries, represented as two parallel lines with “+12V” and “-12V” labels. The diagram clearly shows the flow of power from the solar panels, through the charge controller and battery switch, to the batteries, illustrating the control the switch provides. Remember, always use appropriately sized wiring and fuses for safety.
Battery Switch and Inverter Interaction
Your travel trailer’s battery switch and inverter work together to manage your DC (battery) and AC (household) power. Understanding their relationship is crucial for safe and efficient power management. The battery switch acts as the main on/off switch for your battery bank, while the inverter converts DC power from your batteries into AC power for running appliances. Their interaction determines when and how your inverter can access power.The battery switch controls the power flow to the inverter by either connecting or disconnecting the battery bank from the rest of the electrical system.
With the switch in the “on” position, the inverter receives power directly from the batteries. When the switch is “off,” the inverter is unable to draw power, preventing accidental discharge and potential damage to the system. This is a fundamental safety mechanism.
Inverter Connection to Battery Switch
Connecting an inverter to a battery switch involves several key steps to ensure safety and proper operation. First, you need to choose an appropriately sized inverter for your power needs and the capacity of your battery bank. Next, always disconnect the battery’s negative terminal before making any connections. This is crucial to prevent accidental short circuits. Connect the positive (+) wire from the inverter to the positive (+) terminal on the battery switch output.
Then, connect the negative (-) wire from the inverter to the negative (-) terminal on the battery switch output. Finally, reconnect the negative terminal on the battery. Always use appropriately sized wiring and fuses for the inverter’s amperage draw to prevent overheating and fire hazards. Remember to consult your inverter’s installation manual for specific instructions.
Inverter Configurations and Battery Switch Integration
Several inverter configurations exist, each impacting how it interacts with the battery switch. A common setup involves a single inverter connected directly to the battery switch. In this configuration, the inverter shares the battery bank with other DC-powered devices. The battery switch controls power to all devices connected to the battery bank, including the inverter. Another configuration involves multiple inverters, perhaps one for high-power appliances and another for smaller devices.
In this case, each inverter might have its own dedicated circuit breaker or fuse connected to the battery switch’s output. This allows for better management of power distribution and prevents overloading a single circuit. A more advanced setup might include a charge controller and solar panels. The charge controller would manage the charging of the battery bank from solar panels, while the battery switch controls the power distribution from the charged batteries, including to the inverter.
In each scenario, the battery switch acts as the central control point, determining if power is available to the inverter.
Mastering your travel trailer’s battery switch isn’t just about avoiding dead batteries; it’s about maximizing your RV’s capabilities and ensuring safe electrical practices. By understanding the different switch types, their functions, and potential issues, you’ll be well-prepared to troubleshoot problems, integrate solar and inverter systems, and keep your power running smoothly on every adventure. Remember safety first – always disconnect power before working on your electrical system.
FAQ Compilation
What happens if my battery switch is left in the “off” position?
Leaving the switch off completely disconnects your house batteries from the charging source, preventing them from charging. This will lead to a dead battery if you use any power from your house batteries.
How often should I check my battery switch for corrosion?
Inspect your battery switch and connections at least once a year, or more frequently if you travel in harsh conditions (salt air, dusty environments).
Can I use a battery switch from a different type of vehicle in my travel trailer?
No, it’s not recommended. Travel trailer battery switches are designed for specific amperage and voltage requirements. Using an incorrect switch could lead to damage or fire.
What type of tools do I need to clean a corroded battery switch?
You’ll need a wire brush, baking soda, water, and possibly a battery terminal cleaner. Always disconnect power before cleaning.
